How To: Create Interface Codes for Book4Time
This document will review creating new interface codes for the Book4Time Integration in Yellow Dog Software
Overview
If additional Class, SubClass, Departments, or Brands need to be added to items in Yellow Dog users can create the new interface codes themselves with the correct permissions.
Note: Users will need to confirm with Book4Time what the Code and Description should be prior to creating them.
Required Permissions
To complete this task users will need access to see and edit interfaces. If your user does not have this permission, you will need to reach out to your on-site Admin for assistance.
Creating Codes
From within Yellow Dog navigate to Interfaces under System Setup
From the
Stores option at the top of the screen, select the three dots on the far right,
and select the store in question. Note: Best practice is to select one
store at a time.
Once the store has been selected, users will see the various sections of interfaces that are set for their system – typically users will see one area per Point of Sale. For Book4Time, however users will utilize the section that is called ‘Generic’ Users will note that the options for Generic all have a next to them. This indicates that a code can be added. NOTE: The labels ‘Generic level A’, ‘Generic Level B’ can all be updated to Match what the field is called in Book4Time. Steps for that process are in the next section of this document. 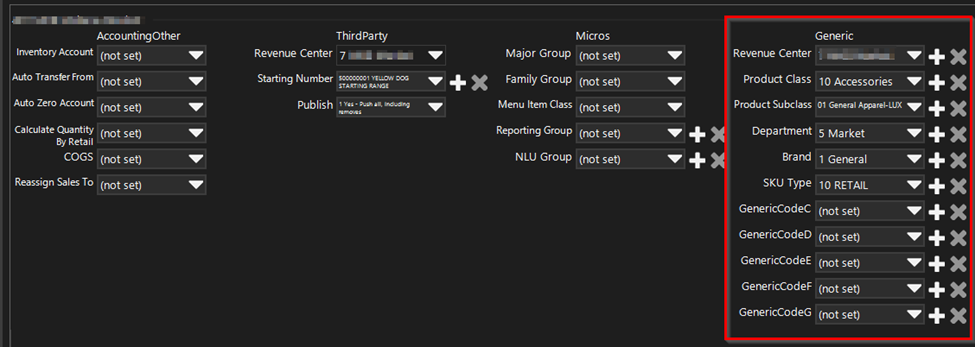
For this example, we will create a new Product Class/Generic Level A –
select the  next to Generic Level A/Product Class. In the
pop out enter the Code or numerical value associated with the Product Class,
and the Description
next to Generic Level A/Product Class. In the
pop out enter the Code or numerical value associated with the Product Class,
and the Description
Once complete- select OK, and the new interface setting will now be
available to assign to levels, or items. If the new interface isn’t immediately
available, please close Yellow Dog and re-open the system
Yellow Dog Generic Interfaces =Book4Time Fields
- Generic Level A = Product Class**
- Generic Level B = Product Subclass**
- Generic Level C = Department**
- Generic Code A = Brand**
- Generic Code C = SKU Type/Available at POS ** Indicates a required field
How To: Relabel Generic Interfaces
- Users with appropriate permissions can utilize the Label feature to re-name the generic interface settings to match what is listed in the POS.
- From within Yellow Dog navigate to System Setup/Options/Labels
- Scroll to Generic Interfaces
Related Articles
Yellow Dog/Book4Time Integration Overview
This document will provide an overview of the Yellow Dog Book4Time Integration Integration Approach This is a 2Way Integration – we present item information and are provided sales information. NOTE: There is no sync application that can be controlled ...How To: Create Interface Codes for Springer Miller
This document will review creating new interface codes for the Springer Miller Integration in Yellow Dog Software Overview If additional Menus, Departments, Posting Codes, Discount Types, Tax Types or Comp Plans need to be added to items in Yellow ...How To: Create Interface Codes for Spa Soft
This document will review creating new interface codes for the Spa Soft Integration in Yellow Dog Software Overview If additional Department, Class, Division, Cuserdef1, Cuserdef2, Cuserdef3, PMS Posting IDs need to be added to items in Yellow Dog ...How To: Create Interfaces Codes for Galaxy/Gateway
This document will review creating new interface codes for Gateway/Galaxy integration in Yellow Dog software Overview If additional Discount Groups, Taxes, Comps or Fkey Flags need to be added to items in Yellow Dog users can create the new interface ...Quick Reference: QR Codes affecting Barcode Scanning
QR codes are increasingly common on product packaging. When a QR code is too close to the UPC barcode, the scanner may read the QR code instead. This can cause the wrong item to be scanned or an 'Item Not Found' Error when scanning items at the point ...
Popular Articles
How To: Find Your Yellow Dog Inventory Version
Understanding which version of Yellow Dog Inventory you're using is essential when exploring new features, as some enhancements and functionalities are specific to certain versions. All client types can benefit from knowing their Yellow Dog Inventory ...Feature Overview: Par & Re-Order Points
Par levels and reorder points help streamline purchasing in Yellow Dog. Par level is the ideal quantity to keep on hand. Reorder point is the minimum quantity that triggers reordering. You can update par and reorder points in the following locations: ...How To: Install the Zebra ZD411 Printer Driver
End user · Yellow Dog Inventory 2026 WHY IT'S IMPORTANT When you install the correct driver, Windows can communicate with your Zebra ZD411 printer so it prints labels and tags reliably from Yellow Dog Inventory. Without the driver, the ZD411 will not ...FAQs: What are Bins?
End user · Yellow Dog Inventory 2026 Question: What are Bins? Answer: Bins are optional location identifiers that specify exactly where an item is stored. The Bin field is free text, so you can use letters or numbers. You don’t need to create bins in ...Food and Beverage User Manual
The Food & Beverage User Manual is your key to understanding the potential of Yellow Dog. Whether you're a first-time user or a seasoned pro, this detailed manual will help you understand how to best utilize your Yellow Dog Inventory system. Download ...